

We made this banner in celebration of the grand opening of Small Pond Arts on May 23, 2010. Our first question when setting out to make it was exactly how big should it be? We knew our silo was BIG – anyone could see that – but we had no way of actually measuring it. So we measured as much as we could with a tape measure (10 feet), then guesstimated that was about a quarter of the silo's height, so it was about 40 feet tall. In order to create something large enough to suit the scale, we figured the banner should be about 20 feet tall. Anything smaller and the banner would look like a postage stamp.

Look waaaay up!
I’d been saving white tablecloths and bed sheets for a while, and we scrounged a few more from a thrift store. The red fabric was left over from two previous projects: stilt pants and puppet clothes. Lucky for us, Milé's mother had just bought us a new sewing machine, and even luckier, my youngest sister, Caitlin, was coming to visit – and man, that girl can sew.

This is NOT the new sewing machine… this is Sew Awesome, which we picked up at our favourite store, County Traders
I didn’t want to buy any more fabric than what we had. Not only are we on a fairly strict budget, but using what is at hand is part of my artistic philosophy; I enjoy making things from recycled and freecycled materials wherever possible.
With the material that we had, we fit it together like a jigsaw puzzle, configuring it into a 20 foot by 10 foot banner. We pinned it together in sections in the living room; there was nowhere big enough that we could lay it all out – nowhere clean enough for a white banner, anyway.

Caitlin sews up a storm
Caitlin set about sewing this monstrosity of white sheets together at our ample dining room table, stitching, double stitching, and triple stitching for strength. It gets pretty windy up here at Small Pond, and so durability was everything. I washed the red material and hung it on the fence to dry – we didn’t want any bleeding hearts on our silo.

"Wasn't it hard to hang on to the side of the silo while you were sleeping?" - Krista's Uncle Dan
When the pieces were all sewn together, Caitlin sewed the heart into the middle. She made the heart double-sided (like you would make a cushion) and turned it inside out, giving the heart a nice edge and perfectly-formed shape. Finally, she sewed channels along the top and both sides of the banner. We fed heavy rope, recycled from our dismantled electric horse fence, through each of these channels, and tied the ropes together where they met at each corner of the top. We used 100 feet of rope along each side – it had to reach from the outside bottom of the silo, all the way up and over the top, and then down again to the bottom inside the silo, with plenty of extra rope at each end to be secured to cinder blocks.
As much as we made this banner as strong as we could, right from the beginning we had to accept that this banner would be a temporary installation. No matter how well we built it, there always existed the possibility that one morning we would wake up to find that the banner had simply vanished, whisked away by some gale force bandit of this windy island. (Spoiler alert: three weeks later, the banner is still there in all it’s glory. Good sewing, Cait!)
One week before the party, Team Silo (Milé, Guy, Caitlin and me) woke up early, and carried the banner out into the sunshine.
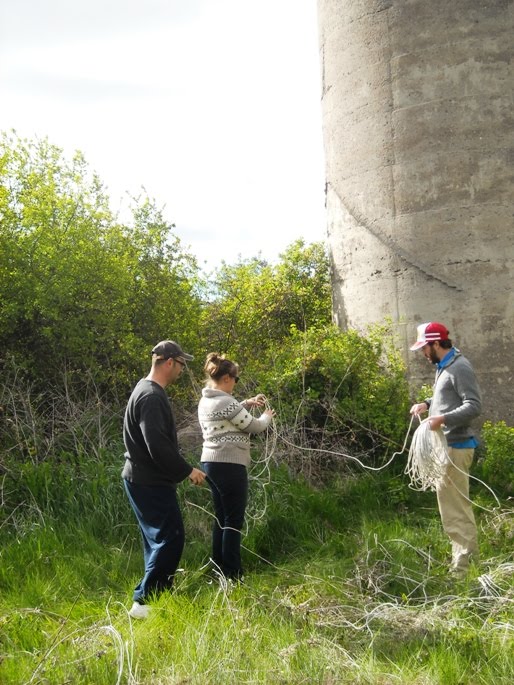
Using duct tape, we secured a rock to a length of binder twine and then taped the twine to the tops of the two ropes. It took a while, but Guy managed to hurl the rock up and over the silo wall without too much trouble. We hauled the banner up, two of us inside the silo and two outside. The wind was picking up at this point and the ropes at the top seemed to be hopelessly tangled. After struggling with it for some time, I was forced to admit that we’d made a mistake by throwing the ropes up together: they needed to be thrown up separately so the banner would be held open. Failure is part of many creative processes… and so we took the banner down.

So now we had two rocks, taped to two pieces of binder twine, taped to two pieces of rope… and Guy limbered up and started throwing. Fast forward… and the rocks had been thrown over in the right locations, and we were hoisting the banner up and into place. The ropes were tied to the cinder blocks and adjusted so that the banner would hug the silo as tightly as possible.

The banner was made exclusively from recycled materials – barring the thread, which was new – and cost about $20 and 3 days to make and install. All of our visitors love our silo even more now, and so do we. I have a vision of knitting a giant, woolly silo cozy by the time winter rolls around (frenetic knitters, please contact me!). There are many neglected, naked silos dotting countrysides across the land; now will someone dress them, please?
Speaking of knitting a cozy, you should talk to the folks in Cambridge ON, who completely covered their historic town bridge back in the early Fall. http://www.knitcambridge.com/theproject.html
ReplyDeleteMy sister sends you this. After the photo op, unravel and use the wool for a good cause
ReplyDeletehttp://www.warmhandsnetwork.org/