Showing posts with label food. Show all posts

05 June 2014

Scalloped Potatoes & Pineapple Upside-Down Cake


My main goal of these food-based Special Projects is to learn how to bake –initially focusing on some of my favourite foods from my childhood– and, having now covered most of them, it was time to start learning some of Krista's faves. I'd made scalloped potatoes before, so most of my learning this time around was still cake-based.

Marriage.

The potato recipe I used last time was fairly basic (potatoes, cheese, seasonings, and a cream sauce), but something like this seems naked without onions...and mushrooms go very well with onions, especially when they cook down together over low heat.

Chips?

Back in the 90s I worked at The Shopping Channel and actually bought a few items that I still use today, including a mandoline. Every time I use this thing, I'm impressed with how fast, efficient, and easy it is.

Chip?

Look how thin this is! I sliced up about seven or eight potatoes faster and thinner than I ever could with a knife.

Handy! But sharp!

Make sure to use that safety cowboy hat thing or you might hurt yourself. I know from experience (and three stitches). Please note: that's not blood, that's oxidized potato juice.

First base, part one.

While the onions and mushrooms continued to cook down, I started the assembly.

Cheesy.

We had a little bit of zucchini in the fridge, so I added what was left before adding the first cheese layer.

Shiny!

On another layer of potatoes went the onions and mushrooms. Then, on yet another layer of potatoes, I added some cheese of the La vache qui rit variety. I believe it's hard to overdo the cheese on so many dishes and usually feel there isn't enough. There's also parmesan sprinkled throughout.

Bonus.

Here's the addition that Krista's mom made to customize this dish: breakfast sausages. I browned them after the onions were done, but probably should have put them on a lower layer for easier stacking. Maybe next time.

Ready to bake, part one.

One last layer of cheddar on top, sprinkled with some parmesan, bread crumbs, and oregano, and it was ready for the oven.

Golden.

Just over an hour at 350° later, it was ready, but there was no time to sit around, I had a cake to bake! As soon as the potatoes went in the oven, I started the cake process...

Return of The Specialist.

Until the day my hands give out and I can't sufficiently mix my cake ingredients with that tool, I'll have no need for a mechanical mixer.

First base, part two.

Slices of pineapple decorated with maraschino cherries atop melted butter and brown sugar is one of the easiest and most retro-looking bakery-based things I've ever done.

Let's take a closer look:
Retro.

It looks like something from a 1970s American cookbook. And I like it.

By hand.

I suppose I could whisk most of the stuff I use The Specialist for, but I like it too much and it gets the job done.

Ready to bake, part two.

Coincidentally, the cake also needed to bake at 350°, and it timed out perfectly after the prep and dish washing; the cake went in as the potatoes came out.

Golden.

As though baking itself wasn't challenging enough for me, there was a curveball here I had to successfully hit: flip the cake so that the pineapple is on top (something I might have seriously messed up when I was first experimenting with baking as an adolescent and failing horribly at it, which steered me away from the practice for decades).

Flipped!

The flipping worked! We don't yet have an appropriate serving plate for a cake this big, so I just used a cookie sheet to flip and serve. I don't think I'd ever had this before, so it was hard for me to judge its success –other than it was quite tasty– but Krista was happy (with both dishes), so that was good enough for me.

The recipe I used for the cake is from Sally's Baking Addiction. I might try others just for variety down the road.


12 May 2014

Makedonski Maznik


Back in January I tried my hand at making lokum (AKA Turkish Delight) and, having had a great deal of success with it, I've made a few more batches since. Now it was time to move on and continue my plan of learning how to make some of the other foods I've enjoyed since childhood and today's Big Experiment was maznik, a pastry made with phyllo dough and feta cheese (other fillings are optional (nuts and raisins, meat, spinach), but feta was the main filling I experienced and loved as a kid, so that's what my first batch contains).

Maznik (like graf, a lovely, rich bean soup I learned to make years ago) was one of those dishes from my Macedonian heritage that seemed ubiquitous to me while growing up in the 1970s and 80s: my mom made it, my aunts made it, and it was served at every house we'd visit...and they all were more or less identical, as though some ancient Maznik Master had trained them all; certainly, the recipes have been passed down through numerous generations. The maznik of my youth that I tried to recreate here was flaky, salty, very tasty, a bit greasy, and very popular with everyone; I can't remember anyone who didn't like maznik.

For this project I used a combo of recipes and techniques from the internet (videos, blogs) as well as memories of helping my mom and aunts decades ago. Why didn't I just ask my mother for her recipe? I have no idea, actually...

Second doughy attempt.

Before I did anything with the ingredients, I donned an apron, mostly for moral support, and cranked up my Macedonian music playlist to set the appropriate mood.

I mixed two cups of flour with half a teaspoon of salt and some water to make the prime dough ball. On my first attempt I used too much water and it became a big sticky mess, so I chucked it and tried again, this time I added tiny amounts of water, gradually, to make sure I didn't overdo it, and I think it worked pretty well, if not exactly perfectly.

Soak 'em!

I cut the dough ball into thirds and made smaller, more manageable balls to soak for about 15 minutes in 100mL vegetable oil and 100mL (melted) Crisco. This makes the dough stretchable and allows it to pretty much fry in the oven. Just don't think about all that greezyness...

Cheese 'em!

Because it's the way I've seen it made all my life, I bought a broom handle specifically to roll out the maznik dough and asked my mom to give me a sheet of the heavy fabric she uses to make the stuff herself, but it turned out I didn't really need either of these task-specific tools. I did bring out my first stretched out round to the broomstick and cloth to sprinkle the feta cheese on it. Note the minor tearing here and there: no big problem once they're rolled up.

Roll 'em!

Since I brought it all the way over to the cloth, I used it to roll the first bit of dough into a long, cheese-filled shape, but I rolled the other two by hand quite easily on the kitchen table, adding small amounts of the excess oily mixture as needed to help with the elasticity.

Shape 'em!

These were much smaller than the ones I'm used to. Normally, the dough wouldn't be split into three but stretched out whole over the tablecloth, then rolled and spiralled into a large circular pan. I didn't mind these cute little guys being smaller, snack-sized mazniks.

Bake 'em!

For some reason, I decided to add an egg wash over them before baking –this isn't necessary or even common (and perhaps overkill) but what the hell, it didn't hurt.


Eat 'em!

The snack-sized mazniks turned out quite well, but they weren't like the ones I'm used to; these were more like burek, with a crispy outside and soft, creamy inside (best eaten while still fresh and hot). I could have stretched the dough a teeny bit more and maybe used the middle rack in the oven instead of the bottom one. I'll probably try a different filling next time...or maybe make burek!...or maybe just go and watch my mom make this –a lesson would be nice. Anyway, they were pretty good.

Next up for the Small Pond Special Projects Division (this week!) will be a layered lemon cake –a more elaborate version of the standard birthday cake my mother made during my early childhood.

09 August 2012

Grave Robber

In July 2012 we held our second annual Cornography, a festival of art on the theme of food.

The afternoon included A Funeral for Bad Food, detailed in an earlier blog post.


Are you curious about what food our audience members wanted to put six feet under? Well, I was too, so I dug up all those little coffins. Call me a grave robber if you will, but I couldn't resist. 


Here's what they said (spelling intact!):
- Chicken fingers
- Bottled sauce (had a picture of skull and crossbones)
- Trans fats
- Fast food
- The sardines my neighbour smokes
- Candy
- Onion
- Jelly beans
- Monsanto corn
- Flesh of animals... cute or otherwise
- Peel chopped boiled potatoes
- Unagi
- Salad 
- Potatoes
- A & W fast food
- Brussel sprouts
- Cheese strings and yogurt tubes
- Brocili, brustles sprouts, green beans
- Bologna
- Coca Cola
- Catchya later, ketchup!
- Mushrooms
- Snickers
- All GMO's
- GMO soya
- White bread
- RIP chips
- I wish I wish I never heard of chips!!!
- Chicken McNuggets
- Factory-farmed cows
- Ban Duncan Hines - put some effort into scratch
- Cheese
- Brocili
- Wheat
- Macaroni infused deli meat
- Kraft Dinner

I love the diversity in what people wrote! Everything from the obvious evils concocted by our corporate overlords, to the naughty snacks we struggle to resist, to children's loathing of vegetables. It's a beautiful thing to see people of all ages embracing the opportunity to express their ideas and opinions.

What food would you banish if you could have things your way?

24 July 2012

Cornography – The Second Popping


We’re still basking in the glow of the second annual Cornography, which took place this past Sunday at Small Pond Arts. Cornography is an art festival on the theme of “our twisted relationship with food” which the audience discovers as they are led from location to location around our farm.


The afternoon started off with a Punch & Judy show, performed by yours truly, wherein the devilish Punch throws his baby out the window while the missus is at the farmer’s market. ("What, you haven't seen a bit of good old-fashioned violence before?")

Milé, dressed as a chef, then led the audience back to the barn, where they were greeted by Reverend Rick Zimmerman, who welcomed the audience to the Funeral for Bad Food:

“I want each of you to ask yourself this question: If I could say goodbye forever to one grocery bag beast, one dinner table tragedy, or, as the kids today would say, one food fail – what would it be? For today we shall topple the burger king… we shall banish the Brussels sprouts, or burritos or bonbons. Yes, friends, this is a funeral. It is time to Pills….bury….your bad food choice.”

He held aloft a coffin-shaped piece of cardboard.

“You will each get a coffin just like this….write down that item, that food failure, that corrupt culinary concept that you wish to cast out. A brisket, a basket, just write it on your casket. Let me put it to you as plainly as I can - place on your sarcophagus that which sticks in your esophagus!”


When everyone had written down their idea of Bad Food, we had a funeral procession through our back field. When we reached the grave site, the Reverend was awaiting us. He tapped each person with a wooden spoon, and each spoke the name of their Bad Food and flung it into the grave – to which we all shouted “Expired!”

photo by Marnie Woodrow
Hands down, it was the best funeral I’ve ever been to. Of course every funeral worth it’s salt has a reception afterwards, so we noshed on fabulous skull and bone cookies made by RuthGangbar, which a bunch of us had decorated the night before.


Next the inimitable Tamara Segal and Chris Byrne led the audience on a musical foraging walk, pointing out edible wild plants growing all around us which are not only nutritious, but tasty, too! 


Meanwhile some folks were in the barn, making a variety of potato people with our queen of craft, Cynthia Dinsdale. We also had food-themed art hanging in the barn, including work by Erin Johnston, Sarah Renaud Wilkinson, Brandy Gale, and of course, Milé Murtanovski.


Next the audience was led to the silo, where Christine Renaud performed some spoken word. She got the audience involved using the human microphone technique, and then got a bunch of volunteers to get into the silo to perform one of her poems, creating a human ‘silophone.’


Children’s entertainer extraordinaire Andrew Queen was up next, performing some great foodie folk songs from his album ‘Grow.’


Finally, the audience gathered around our new cob bake oven, where Jennifer Morales, a Small Pond resident artist from Milwaukee, read her poem Brought to Light. The poem speaks of fire: “Our kind want to burn…

Yes, we do. The day was coming to a fiery close; the oven had been lit two hours earlier, and I said a few words for our oven inauguration.

“...With the help of our friends and neighbors we built this oven with our hands. The clay that binds the oven together we dug from under foot; we mixed it with sand and hay and water, and stomped it with our feet. The rocks that make up the base were gathered from all over our property. It took a long time to make this oven, but it was worth it, because we weren't just making it for ourselves, we were making this oven to share with all of you. In the days, months and years to come, this oven will be used to create countless meals, meals made by hand, like the oven itself. Once the oven is fired it stays warm for many hours, and we hope to establish a regular baking schedule, so as a community we can share this warmth with each other. Let this oven serve as a symbol of the good things we can create when we work together.”

The afternoon culminated in a DIY Pizza Party, where folks made their own pizzas and had them fired in the oven by the unflappable Susan Larner.

Susanne masters the oven! Photo by Ruth Gangbar

People lingered long after the show was over, not just savouring the pizza, but reluctant to let go of such a sweet afternoon together.

A big huge thanks to the many artists, foodies, friends and neighbours who helped make this such a wonderful afternoon. We couldn't have done it without you.

15 August 2011

Relish

Live daringly, boldly, fearlessly. Taste the relish to be found in competition - in having put forth the best within you.   
   - Henry J. Kaiser

None so little enjoy themselves, and are such burdens to themselves, as those who have nothing to do. Only the active have the true relish of life.
   - William Jennings Bryan 

You may ask yourself,
"How did I get here?"

Krista and I just finished canning (in jars, actually) our first batch of "Pappy Relish," a Dalby family recipe I fell in love with while visiting her grandparents years ago. I'm happy to carry on this tradition, but happier to have learned how to successfully make preserves on my first attempt, confidently setting the scene for future canning projects.

But how did we end up with these jars of sweet relish?
Strap yourself in and set the Wayback Machine to December 2010...


Tiny miracles.

Just before Christmas, we attended the Busy Hands Craft Sale to visit a bunch of friends who had great homemade wares on offer, but specifically to get some seeds from another friend, Vicki Emlaw of Vickis Veggies. She had dozens of varieties of vegetable seeds, most of them heirloom varieties, and we scooped up a number of goodies...including cucumbers.


Freshly tilled.

Krista spent weeks out in the cold of March restructuring the garden to be roughly twice the size it was last year. I helped put up the chicken wire and then roto-tilled the soil to prep it for planting when it got warmer (see an action-packed photo in this post).


More tiny miracles.

Meanwhile, many of the seeds we bought were sprouting in our gardening shed, craning towards the faint light of early spring. Like last year we're using only water from our rain barrels (or from the well using indoor taps if we run a little dry like last summer) to water the plants, and we put used coffee grounds from Chesterfield's Homegrown Café and horse manure in the soil to fertilize it before planting (we'll eventually use compost from our bins once it's ready). We're not "certified organic," but we don't use any pesticides or herbicides, opting to grow our food as naturally (i.e. organically) as possible.


Socrates vigilant.

Under the protective watch of our scarecrow, Socrates, the transplanted veggies took hold and flourished, giving us mini-harvest after mini-harvest for weeks...


Sample bounty: July 16.

Clockwise from far left: scapes from the garlic we planted given to me by the Garlic Man; the zucchini that keeps on giving; perfect spinach; the red and green leaf lettuces are a daily harvest; cilantro; basil; beans; and shelling peas.


Sample bounty: August 6.

Heirloom carrots and tomatoes, and...cucumbers. Most of the food  we're eating by now comes from our garden. We even managed to feed lots of hungry artists during Cornography with lots of fresh homegrown veggies.

Brookie picks a cucumber.

We're bound to be overrun by something: last year it was lettuce that we were giving away to anyone who visited; this year it's been zucchini, spinach, lettuce again, and recently, it's cucumbers, cucumbers, cucumbers. Delicious, healthy, hearty, gorgeous, crisp, but abundant cucumbers.

How do you solve a problem like cucumbers?

Like, seriously, we get this amount every four or five days.

"We should preserve them: pickle them or something," I said to myself.
"Shut up," I replied.
"No, really, how hard could it be? People have been preserving food for millennia."
"Shut up," I said again, hoping I would leave myself alone (I had paintings to finish!).
"Look, what about that great relish that Krista's grandfather makes? You love it! You could try making it yourself!"
"Hmm, relish..."
"Yes: relish."
"YES. RELISH."

The Pappy Trinity.

His recipe calls for onions, celery, and cucumbers as the main vegetable ingredients. The celery (and, of course, using only natural ingredients) helps to significantly distinguish this relish from, and elevate it above the store-bought stuff.

Here they are, chopped by hand (unfamiliar with our food processor, I was afraid I might end up chopping the veggies too finely with it; I wanted to better control the size of the chunks --and keep the learning-of-many-new-things-all-at-once to a minimum).

Bathtub of vegetables.
(measuring cup included for scale) 

Add lots of salt and water for the brine, then refrigerate for 24 hours (or overnight, at least). This keeps the veggies crisp and gives you a whole day to realize and accept what you've just committed yourself to.

Rinse cycle.

Rinse the veggies thoroughly with cold water to get as much of the salty brine off them as you can. Make sure you don't knock over that dish soap into the veg mixture.

Division of overload.

There was too much for the pot, so I split it up to cook better (and make stirring easier). I didn't want the relish to be neon green (via food colouring), so I added turmeric for a yellowish colour (and extra flavour). Meanwhile, the jars were being sterilized in boiling water just out of frame.

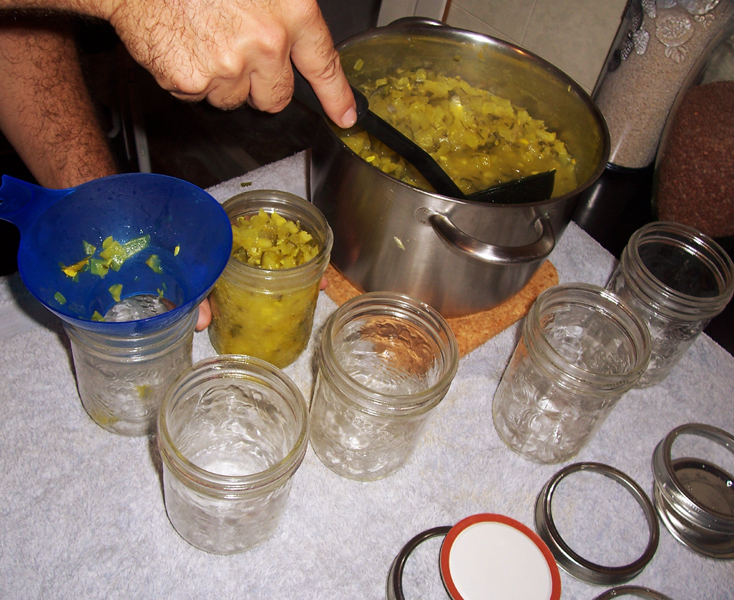
Stand by for action.

Krista joined me during the cooking phase and our teamwork made the task of jarring the relish smoother. Plus, we like dancing in the kitchen.

Combien?

We sterilized six jars thinking that would be enough, but we put in two more at the last minute. The initial recipe said it would yield 16 half pint jars, but I increased the quantity of ingredients to use up as many cucumbers as possible (believe it or not, I managed to use up only six of them!).

Seven jars a-boiling.

We filled eight 500mL jars in the end (4L total), but only vacuum-preserved seven (the last one will have been eaten by us by the time you've finished reading this).

Yum.

As the jars cooled, they gave a distinctive and satisfying "pop" as each lid announced the seal was formed well and that that jar of relish would last for a year (or more!) in a cool, dark place.

So there it is. I wish you could taste it. In fact, I haven't tasted it myself just yet, since it's still hot; I'll have to wait until tomorrow morning.

The Small Pond Arts Canning Adventure (to use up all them damned cucumbers) will continue with Bread & Butter Pickles this weekend...

UPDATES:

21 August 2011:
Seven 500mL jars of Bread & Butter Pickles
(pearl onions: yes; cauliflower: no)

26 August 2011:
Seven 1L jars of Garlic Dill Pickles


04 September 2011:
(Twelve of) Thirteen 500mL jars
of Bread & Butter Pickles

(pearl onions: yes; cauliflower: no)


12 September 2011:
(bottom right) Six 1L jars
of Bread & Butter Pickles

(pearl onions: yes; cauliflower: no)
Location: The Pickle Cave